Monday, February 25, 2008

Fair the rudder using template

I ground down the high points on the rudder. There where 4 areas that had to be ground differently (A,B,C,D) due to the fact that when I glassed the old skin back it was in four panels from the water line down and each panel was off more than the other.


The A section was fine, I just ground off the gelcoat and pretty much had it. The red arrows outline the bevel over the cut that will be glassed over for added strength.

The B section from the leading to trailing edge was to thick so I ground the old skin completely off and thinned the balsa out. I'll lay up new glass and build it up all over again.
The C section had an overly thick area right in the middle so I ground down the skin and ground down some of the balsa. This will be built back up with new glass. The black highlighted areas indicate areas that are fine.
Section D never had it's panel glassed in and it won't be. I'll be laying up new glass in this area.


Monday, February 18, 2008

Rudder - Balsa and skin completed on one side

Underneath the epoxy that was mixed with colodical silica is the 1/4 inch balsa. Once I placed and pressed the skin back on the overflow of epoxy would spill out. Also Note: I spread epoxy/colical silica on the skin before assembly.


80 Pounds of salt pressed and kept the skin in place.
One side with new balsa and the skin put back on. This side will next have the cuts beveled and glassed over with cloth.

Rebuilding the Rudder - continued

Rebuilding the area where the rudder's pintles attach to the rudder and where the Tiller attaches to the rudder with glass and epoxy...there will be no more wet balsa in the rudder again!


Saturday, February 2, 2008

Cutting open the rudder - Summary

The Summary:

  • The balsa was wet throughout the rudder.
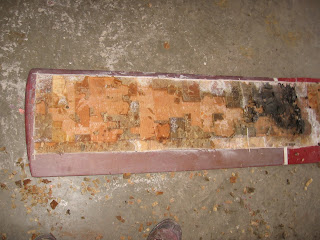
  • Half of the rudder was rotten with no structural integrity.
  • All water damage was a result of the 7 bolts holes exposing the balsa wood.
  • It took 2 hours to cut open and clean out both sides.
  • When cutting open above the water line leave at least 1" from the leading and trailing edges.
  • When cutting below the water line leave 3.5 inches from the trailing edge and 1 inch from the leading edge.


Rudder - Opening up the port side.

Using the measurements from the starboard side I cut open the port side.


Look at the rot around the bolt holes! It doesn't leave much doubt as to where the water was getting in.


Rudder: Opening up the starboard side

The big question....where to cut into the rudder. I used a drill to figure out where the balsa ends on the leading and trailing edges of the rudder. The marker lines indicate that below the water line I need to cut:

- 3.5 inches from the trailing edge
- 1 inch from the leading edge

Above the water line I can cut a close as 1 inch on both sides.


I'm using a grinder with a metal cutting disc to do the job.
The first section is open!

The second section...on the starboard side.
As you can see I was close, the cut can be no closer than 3.25 inches from the below waterline trailing edge.


Rebuilding the Rudder

Rebuilding Rattle and Hum's Rudder:


The above pictures illustrate the stress cracks in the rudder.